Getting Monster Hunter Wild's multiplayer up and running was a challenge. Now that we’ve got the hang of how all those systems interact, it’s time to dive into the tips and tricks that’ll level up your co-op experience. After all, you don’t want to be the person who joins a hunt via SOS flare and embarrassingly carts just moments later, right? These tips are tailored to group play - everything you need to know to become the Monster Hunter Wilds MVP (Most Valuable Party Member)! Or, if you prefer, your Palico might just snatch that title away from you as the Monster Vanquishing Palico.
If you're short on time, check out our written guide.
For those with more time or a preference for it, the video is available at the bottom of the page.
Now, without further delay, here are our 8 top tips for you and your group!
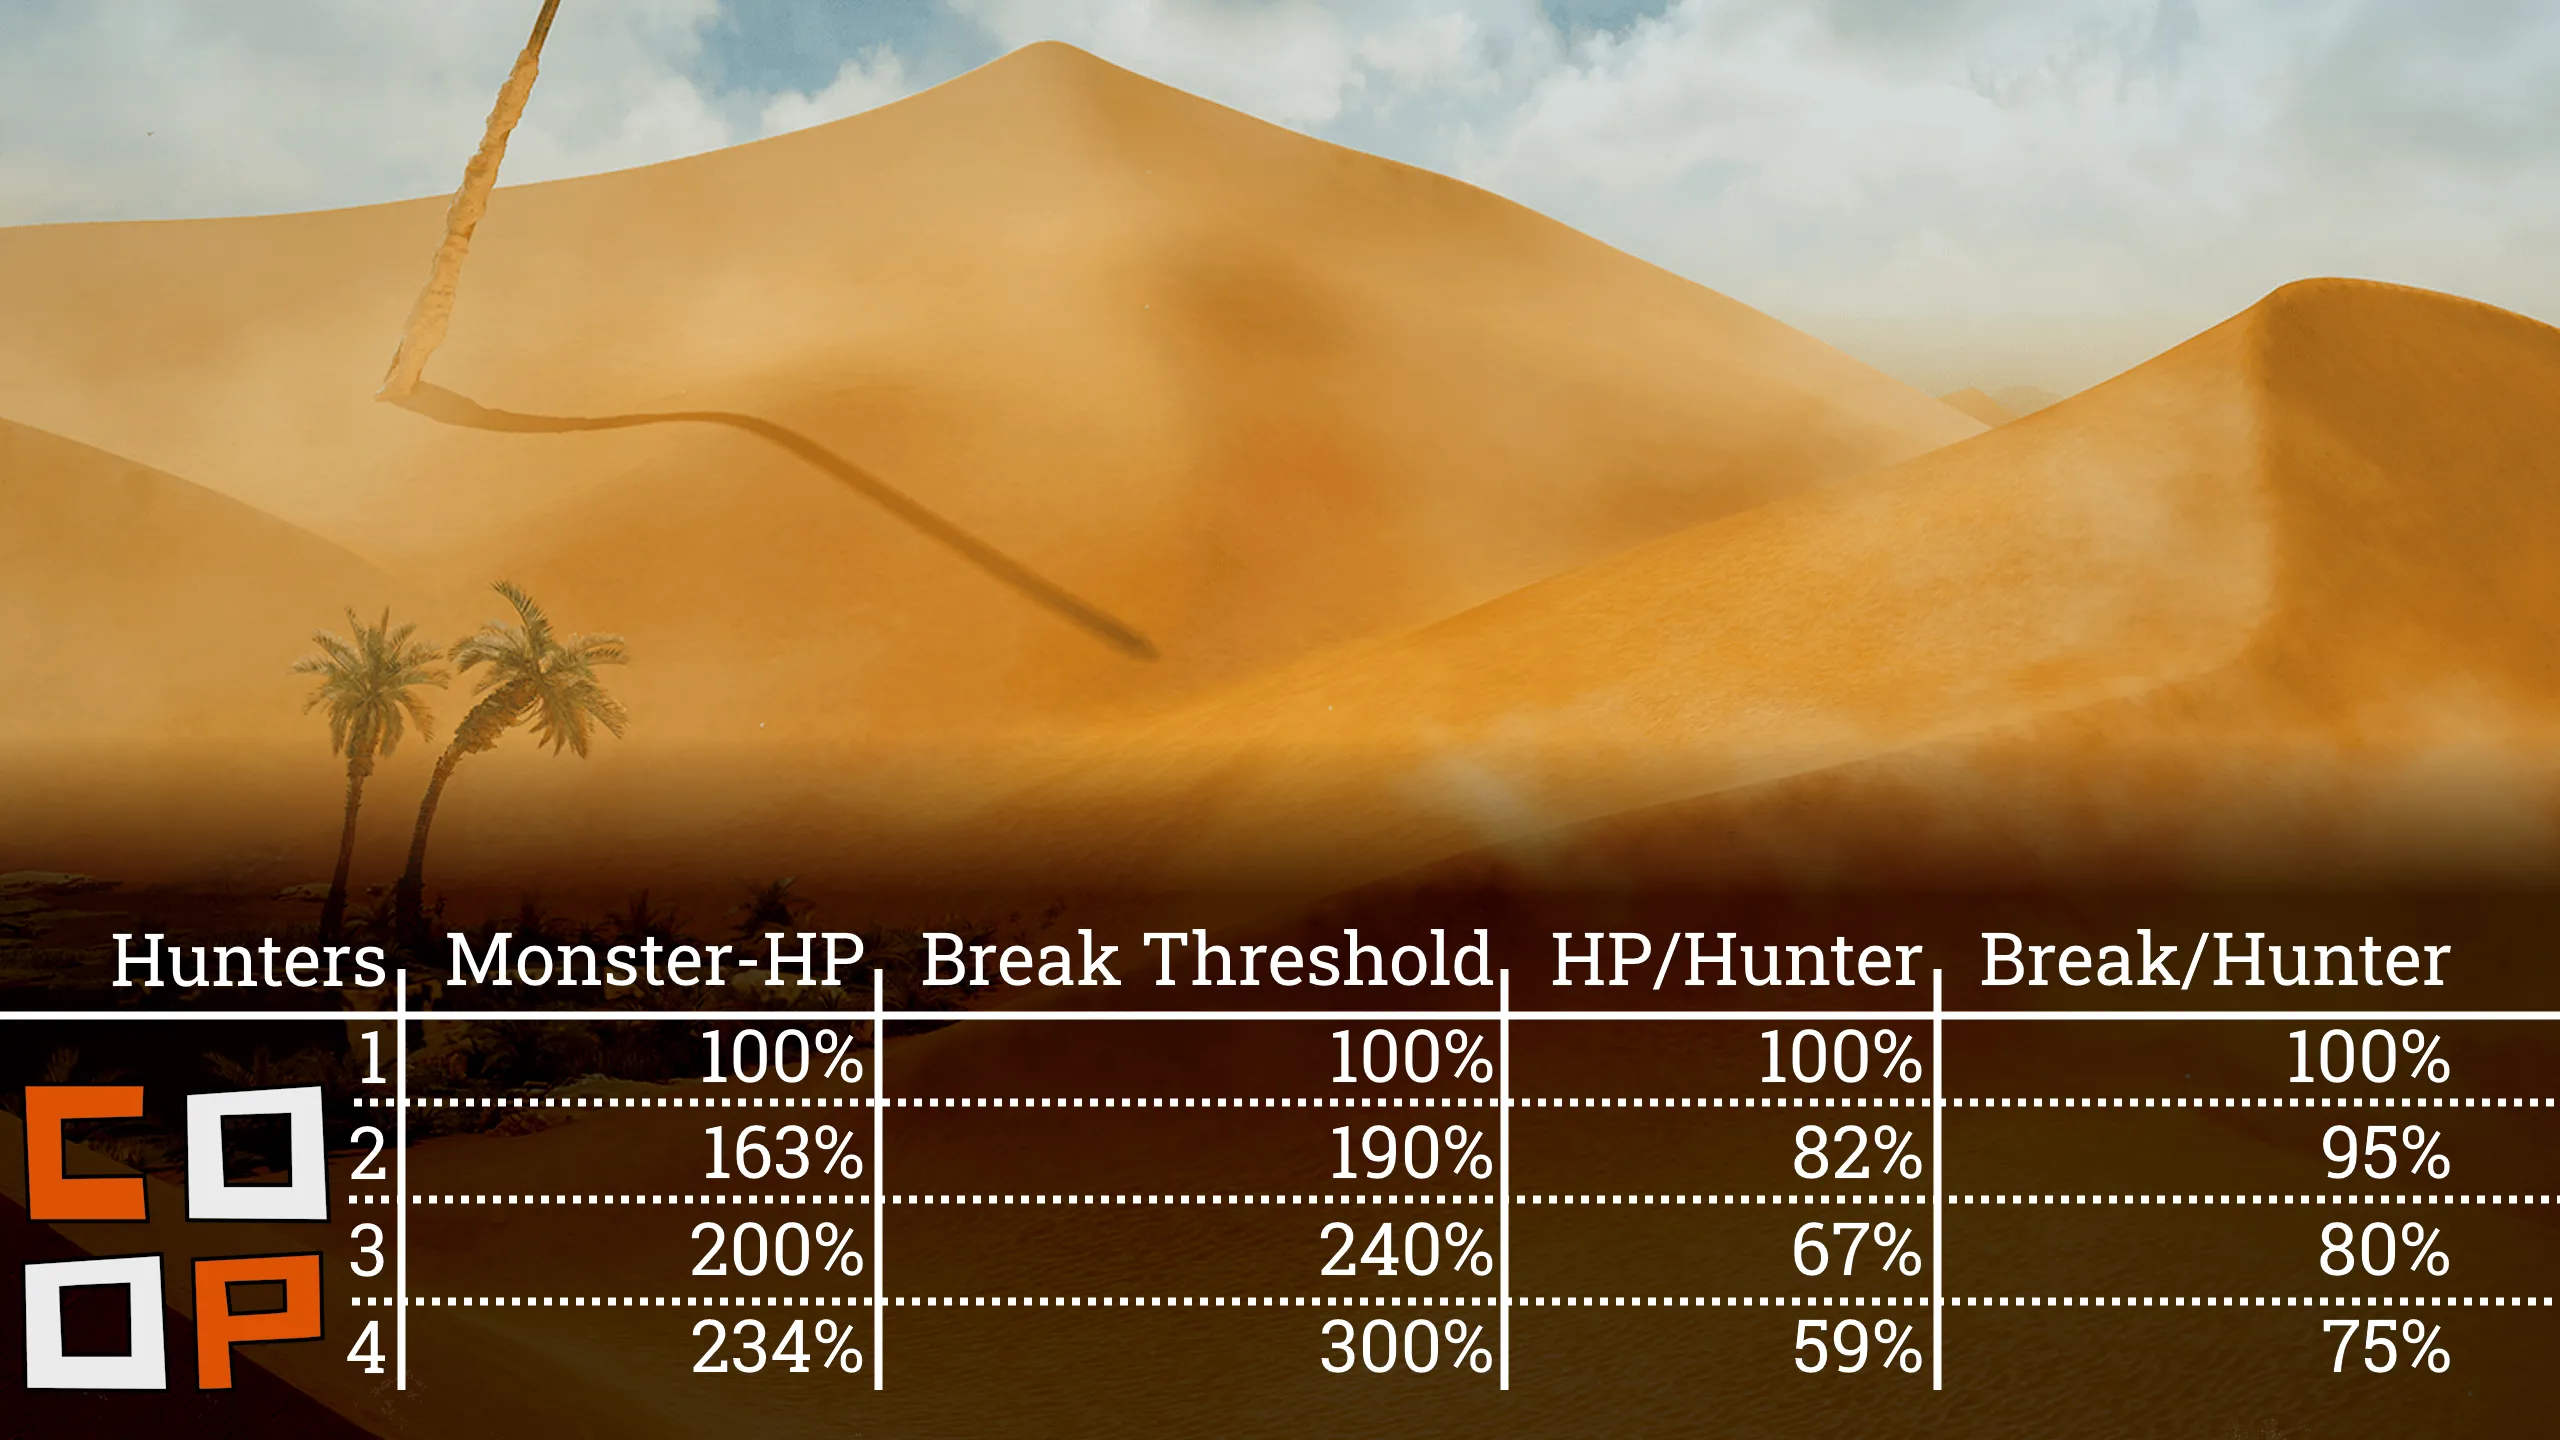
One of the first things to consider is team size. You might think that more hunters = better, but that’s not always the case. While you can team up with up to four players, having a balanced team is key.
Two-player parties: Your Palicos can join in, but the monster scaling is balanced for just two hunters.
Palicos can be lifesavers with buffs, status cures, and even reviving you from a faint! (Just keep their gear upgraded for maximum effectiveness.)
Three or more players: Once you invite a third player, Palicos peace out due to union rules (or something). It’s a trade-off: you gain extra firepower, but lose your furry sidekicks.
Dynamic monster scaling: The difficulty increases as more players join, but not in a linear way - more players make things easier due to the scaling system. If you’re short a team member, don’t hesitate to send out an SOS flare and call in NPCs or other players.

Quick Tip:
If you’re short on players, use SOS flares to recruit other hunters or NPC Support Hunters. NPCs won’t count against your faint counter, which could save your hunt.
Gear Setup - Your Arsenal Makes the Difference
Showing up underprepared is a recipe for disaster. In multiplayer, gear can make or break your group’s chances, so choose your loadout wisely.
Wide Range Skill: It’s available on various armor pieces and decorations. At max level, any healing item you use will also heal your teammates. This is especially useful for a combat medic build while your team deals with the monsters.
Alluring Pelt Armor: A great choice for tanky play, especially for experienced hunters who want to draw aggro away from their teammates. Equip three pieces to activate Diversion and draw the monster’s attention toward you.
War Cry: Found on Blango sets, this skill boosts the attack of your team when you perform the "To Victory!" gesture. It’s especially effective when used on NPCs or Palicos, as it enhances their abilities as well.
Quick Tip:
Remember, you can share gear loadouts with your teammates.
This is a great way to help those still learning the ropes without them needing to figure it out on their own.
Status Setup - Use Ailments Wisely
In multiplayer, applying status effects can help manage the battlefield. But don’t stack the same ailments across your team - diversify to maximize efficiency.
- Sleep: It’s tricky in co-op.The first hit after sleep does double damage, but unless everyone is on the same page, it’s often wasted.
- Poison & Blastblight: Poison deals consistent damage over time, while Blastblight procs more often and staggers the monster.
- Paralysis: Freezes the monster in place - perfect for setting up big damage windows. Coordinate to take advantage of this.
- Exhaustion: Caused by blunt weapons, it significantly reduces a monster's attacks and makes them easier to hit. A great tool for slower, heavier weapons in your team.
- Wounds: Not exactly an ailment but great for crowd control, for synergies check the next section!

Quick Tip:
Don’t double up on the same ailment - resistances build up per monster, not per hunter!
Weapon Setup - Synergize for Success
Different weapons synergize differently with wounds and monster mechanics. To prevent clashes in your group, it’s important to understand how your weapon interacts with others.
- Dual Blades: Can destroy wounds in a single focus strike.
- Longswords: Gain damage boosts after destroying wounds, so be strategic about who gets those kills.
- Insect Glaives & Charge Blades: Replenish weapon energy on destroying wounds.
All these are great, but you don’t want too many in the same party, as everyone might fight for the same wound.
- Hunting Horns: The MVP of multiplayer. Deals decent damage, applies two status effects, and constantly buffs the team with attack - and speed-boosts, fire resistance and more!
- Bowguns: A ranged support weapon, great for dropping healing clouds, boosting attack, or bolstering defense. Also great for status ailment application.
Quick Tip:
Stick to one "wound-hungry" weapon in the group to ensure everyone gets the benefit.
And don’t forget about power clashes and mounts - they can trigger a free damage window for the whole team - but will be interrupted by stuns, paralyzes, staggers and wound-breaks.
So be careful when applying those!
Emergency Setup - Handling the Unexpected
Sometimes, things go sideways. Here’s what to do when your group is in trouble.
- Dodge Rolls: These can save you from taking damage, but be careful about where you roll - especially in tight spaces.
- Slide Attacks: If you’re pinned against a wall, slide attacks can help you escape.
- Seikrets: If you get knocked down or stunned, call in your Seikret for a quick rescue (just hope it’s a successful one!).
- Flash Pods: Interrupt anything - except blind enemies of course...
- Dung Pods: Let the monster retreat to regroup and restock your party.
- Traps: Reliable status application, with limited usage.
Quick Tip:
If you're in a tight spot, try using a Farcaster to instantly escape and return to camp - just make sure to restock them!
Meal Setup: Feast for Success
Meals are essential to your group’s success - don’t skimp on them! A good meal gives your team the buffs they need to survive and thrive.
Defensive Build: Fish-based meals provide a defense boost. Add ingredients like Sild Garlic to prevent fainting - your team will appreciate it!
Offensive Build: Meat meals boost attack power. Combine with items like Wild Seed Oil to enhance status attack potency.

Quick Tip:
If you get invited to a special meal by a character, don’t decline it! These meals offer lasting buffs like additional faints, increased stats or extra carves, which are invaluable for multiplayer.
If you don't have an active meal invitation, you can enjoy similar meals at the canteen in the Grand Hub.
Using the Environment to Your Advantage
The environment can be just as deadly as the monsters themselves. Learn how to use it to your benefit during fights.
Boulders are the obvious choice. These provide huge damage windows and knock down monsters, but you’ll need to draw the monster’s attention to the right spot.
But if you keep an eye out, you might spot way more opportunities: icicles, hanging lianas that can be used as traps, flashfly swarms and even the everforge can be weaponized!
Quick Tip:
Use the minimap to locate environmental traps and boulders to maximize your damage.
If you can't get the monsters attention, use a lure pod and guide them into their demise!
Communication Setup: Keep Your Team on the Same Page
Effective communication is crucial in multiplayer. Here’s how to optimize your in-game communication, especially when you don't want to use voice-com.
Shoutouts: Your hunter will automatically shout things like "I placed a trap!" when you perform certain actions.
Stickers: Use custom stickers to coordinate traps, lures, or simply express your thoughts. These are a great way to communicate quickly.
Paint Pods: Help you point out things of interest.

Quick Tip:
If you can’t get your point across with shoutouts, try using stickers - they’re hard to ignore and can be tailored to suit your needs.
By following these tips, you’ll go from carting to carrying, becoming the MVP of your Monster Hunter Wilds multiplayer hunts! So, next time you hop into a lobby, your teammates will be begging for your guidance. Good luck, and may your hunts be victorious!
In-Depth Video GuideFor even more details, be sure to check out our video!
